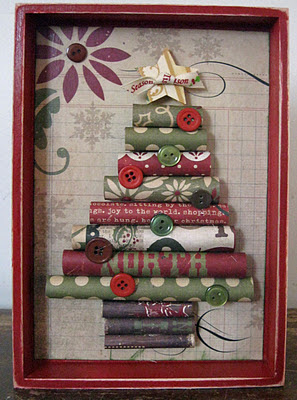
Rolled
Christmas Tree
Need a
little Holiday décor or a cute gift?
These Rolled Christmas trees are all the rage right now; you will see
them everywhere. They look complicated but really they are not only easy but go
together really quickly.
Make one up
today and wow your friends!
Supplies
needed:
Printed
Paper
Star
punch
Buttons
Glue
gun
Red
tacky tape
Foam
dots
½”
dowel (or a pencil if you don’t have a dowel)
*Optional: A
frame or canvas, I bought a wood tray at the dollar store.
(You can
also use a piece of chipboard without a frame if that is all you have on hand.)
Spray
paint
Mod
Podge
Instructions:
1.
Spray Paint the frame to match your paper. Let dry and sand the
edges.
2.
Cut a piece of printed paper to fit the back of your frame.
3.
Use either Mod Podge or Red Tacky tape to adhere the paper to the
back of the frame.
4.
Cut the following strips from Printed paper.
3-2x2 brown
and one of each of the following from random papers
2x5, 2x4 ½,
2x4, 2x3 ½, 2x3, 2x2 ½, 2x2,
2x1 ½.
You may need
to adjust the strips depending on the size of frame you are using. You can add
as many layers as needed just keep them about ½ smaller then the strip under
it.
5.
To make each roll, run tape along the long side of the edge of the
strip and roll it on a dowel. Do this for each strip.
6.
With the seam side down, use
a glue gun to glue each roll to the back of the frame.
7.
Cut or punch out 3 stars.
With foam pop dots layer the stars.
8.
Add the star with one more pop dot.
1.
Tie a knot in the ribbon and glue it to the front of the star with
the glue gun.
10. Use the
glue gun to glue buttons to your tree.
That’s really
all there is to it.
I chose to
use paper from Simple Stories, the 25 Days of Christmas collection. This might be one of my favorites for the season. You could even use scrap paper that you have
laying around.


No comments:
Post a Comment